
F1 Data Analysis with Python - the Basics


If you're anything like me, you enjoy diving into the details of F1 data. Watching post-race analysis is fascinating, especially to see how different teams and drivers performed. Sometimes, you just want to quickly check a specific stat or dive a bit deeper into the race's data. But, as you might know, finding that exact piece of information can be quite a time-consuming task.
This is where knowing a bit of Python or having general programming skills comes in handy. There's this great Python library called 'FastF1' that can really simplify things for you. It's designed to make accessing and analysing F1 data a lot more straightforward and less time-consuming. So, let's get into how you can use FastF1 to get the most out of your F1 data analysis.
Assumptions
Before we go any further, there are a few things you'll need to know to follow along effectively. First and foremost, a basic understanding of Python is essential. This includes familiarity with working with libraries and a grasp of some Object-Oriented Programming (OOP) concepts. Additionally, if you have some working knowledge of Pandas, that's a big plus.
Now, if you've never used Python before, I won't lie – it might be a bit challenging to keep up. But don't let that deter you! Even if you're just starting out, feel free to check out the content. Who knows, it might just spark your interest in learning Python and open up a new world of data analysis for you.
What is FastF1?
FastF1 is a simple yet powerful tool for anyone interested in Formula 1. It's a Python library that lets you easily access and analyse F1 data. The library grants you access to a wide range of F1 data, including lap timing, car telemetry, position, tyre data, weather data, event schedules, and session results.
Installing the library is as simple as running the pip command.
pip install fastf1Get F1 Calendar
In this first example, we're looking at how to retrieve the Formula 1 calendar for a specific season using FastF1.
import fastf1
fastf1.Cache.enable_cache('cache_dir')

schedule = fastf1.get_event_schedule(2023)
print(schedule)
import fastf1 -This line imports the FastF1 libraryfastf1.Cache.enable_cache('cache_dir') -This line is crucial for enabling caching in FastF1. What it does is activate the caching mechanism and sets a directory (in this case, namedcache_dir) where the downloaded data will be stored locally. Once caching is enabled, any data you request will be saved in this directory. If you request the same data again, FastF1 will quickly retrieve it fromcache_dirinstead of downloading it all over again. This speeds up your script and is especially useful if you're working with large datasets or running the script multiple times.schedule = fastf1.get_event_schedule(2023) -This line fetches the schedule for the 2023 F1 season. The functionget_event_scheduletakes the year as an argument and returns the schedule for that particular F1 season.print(schedule) -Finally, this line simply prints the fetched schedule, allowing you to view it.
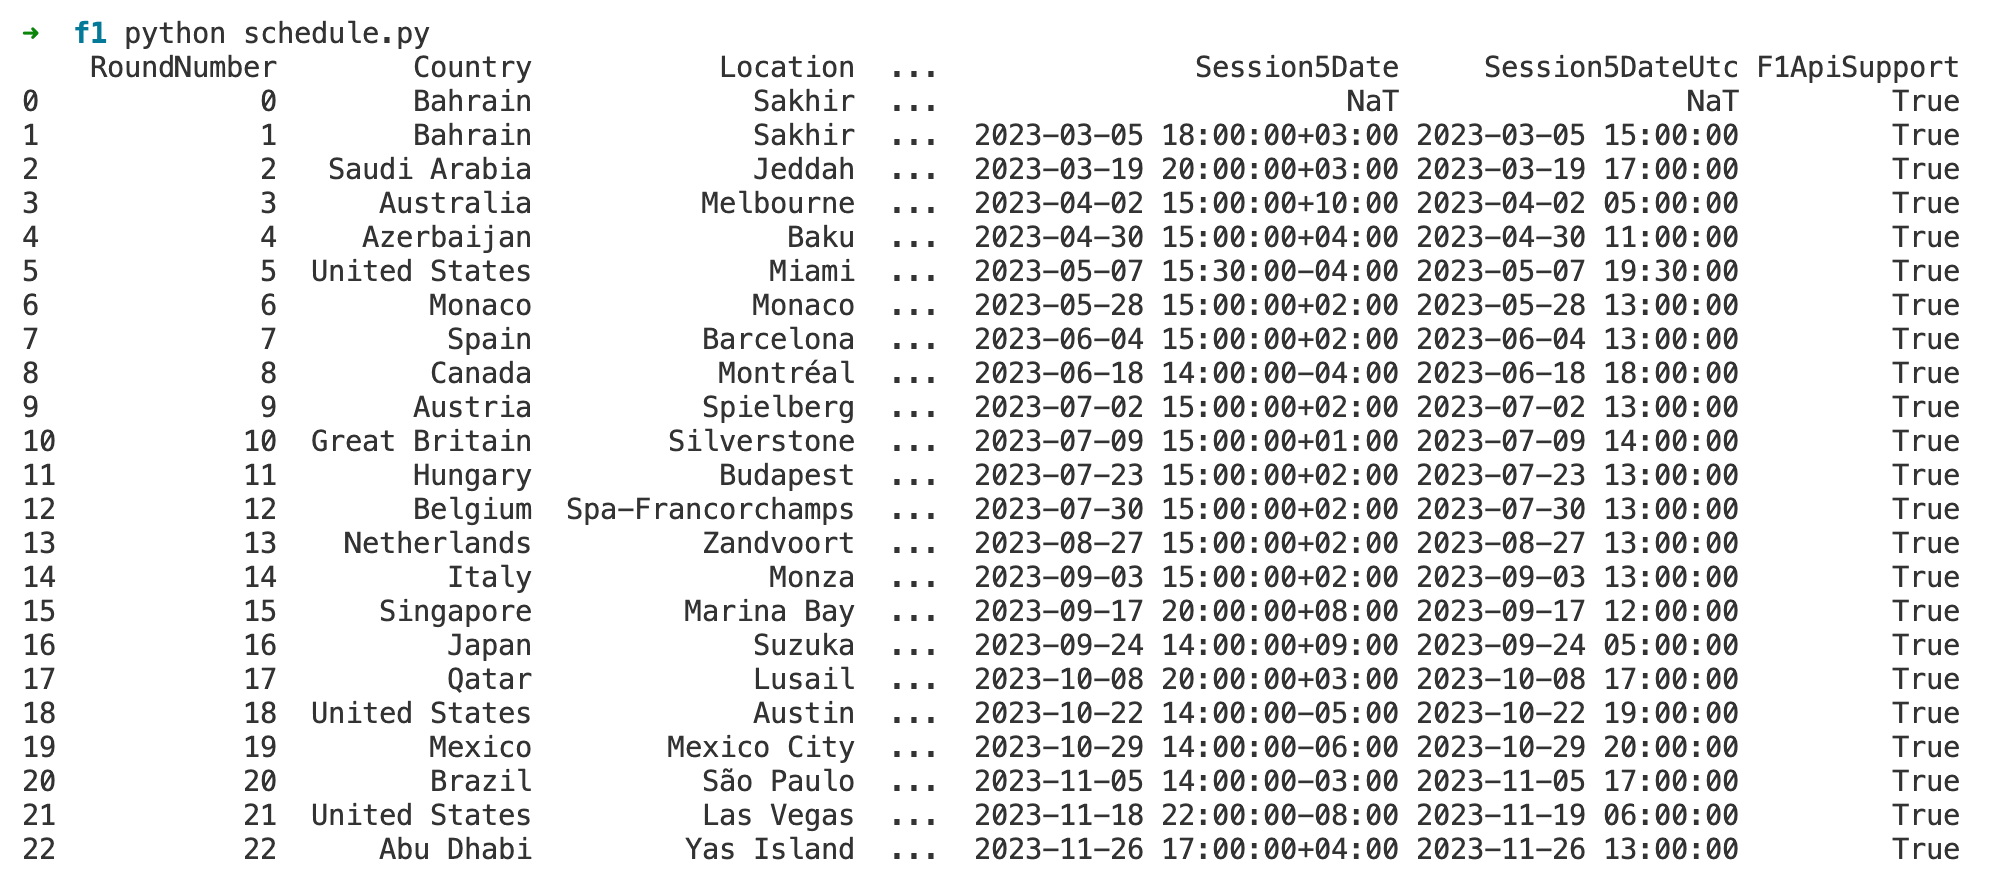
The output shown in the image is a Pandas DataFrame that lists the schedule for the 2023 Formula 1 season. Each row corresponds to a round of the championship, with the columns providing details about each event.
Too Much Data
As you can see above, there is a lot of data to process. The three dots ... in the middle of the DataFrame indicate that there are additional columns in the DataFrame that are not displayed in the output. This is a common way for Pandas to represent a DataFrame when there are too many columns to fit into the display.
You can use schedule.columns which would provide a list of all column names in the DataFrame. This can help you understand all the data points available in the schedule DataFrame.
schedule.columnsIndex(['RoundNumber', 'Country', 'Location', 'OfficialEventName', 'EventDate',
'EventName', 'EventFormat', 'Session1', 'Session1Date',
'Session1DateUtc', 'Session2', 'Session2Date', 'Session2DateUtc',
'Session3', 'Session3Date', 'Session3DateUtc', 'Session4',
'Session4Date', 'Session4DateUtc', 'Session5', 'Session5Date',
'Session5DateUtc', 'F1ApiSupport'],
dtype='object')You can filter the columns and get just the data you need.
schedule.loc[:,['Country', 'Location', 'OfficialEventName', 'Session5Date']]
locis a function used to access a group of rows and columns by labels or a boolean array.:indicates that we want to select all rows.['Country', 'Location', 'OfficialEventName', 'Session5Date']specifies that we are interested in columns with these exact labels. It's a way to filter down the data to just the information you're interested in. In this case, it would return a DataFrame with only the country, location, official event name, and the date and time of the fifth session (which is the race)
F1 Race Stats
In this second example, we're fetching detailed statistics for a specific Formula 1 event, using the 2023 Abu Dhabi Grand Prix as an example.
import fastf1
fastf1.Cache.enable_cache('cache_dir')
session = fastf1.get_session(2023,22,'R')
session.load()
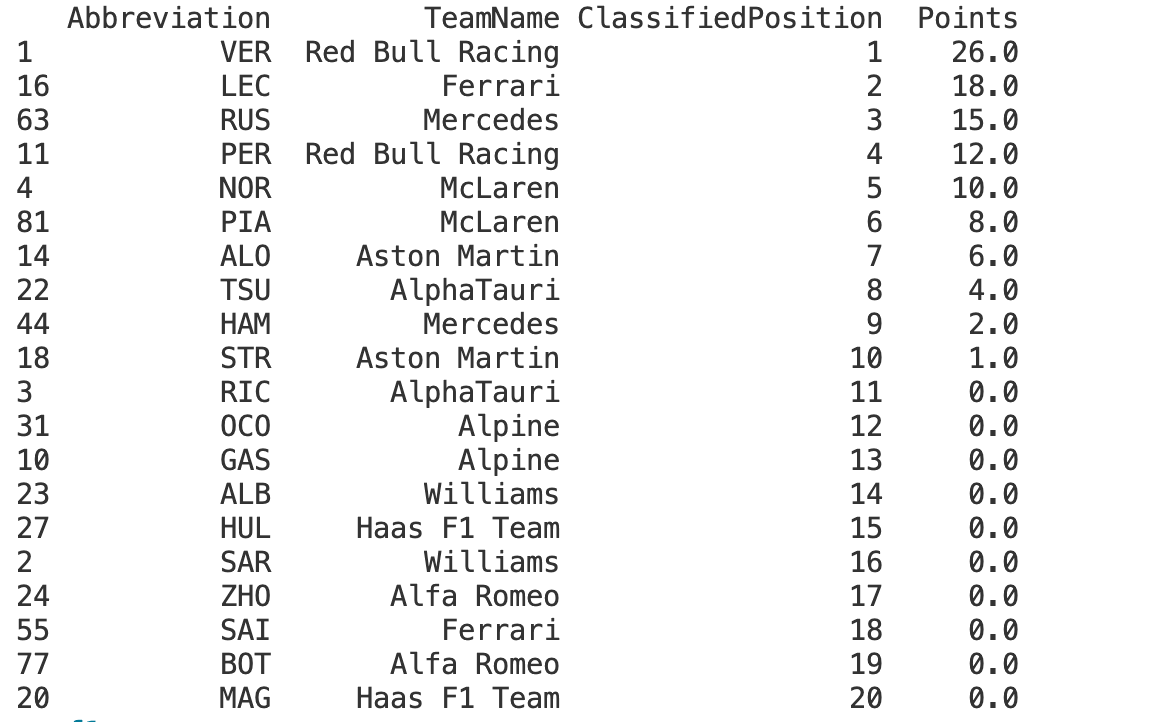
results = session.results.loc[:,['Abbreviation','TeamName', 'ClassifiedPosition', 'Points']]
print(results)session = fastf1.get_session(2023, 22, 'R') -This line retrieves a specific session of an F1 event. The functionget_sessiontakes three arguments:- Year - The year of the season, which is 2023 in this case.
- Round - The round number of the race in the season. '22' indicates the Abu Dhabi Grand Prix, as it's the 22nd round in the 2023 season. Instead of using '22' for the round number, you can also use the name of the location where the race takes place, which for the Abu Dhabi Grand Prix is 'Yas Island'.
- Session - The type of session you want to retrieve. 'R' stands for the race. Other possible values include 'Q' for qualifying, 'FP1', 'FP2', 'FP3' for the three practice sessions, and so on.
session.load()- This line loads the data for the session we're interested in. It's necessary to call this method before accessing session-related data such as results or telemetry.results = session.results.loc[:,['Abbreviation','TeamName', 'ClassifiedPosition', 'Points']]- After loading the session data, this line creates a new DataFrame called 'results' which filters out specific columns from the session's results.- Abbreviation - A short abbreviation of the driver's name.
- TeamName - The name of the team the driver represents.
- ClassifiedPosition - The final classified position of the driver in the race.
- Points - The number of championship points the driver was awarded for their performance in the race.
Fastest Lap Stats
To close things off, let's look at how to retrieve the stats about the fastest lap.
import fastf1

fastf1.Cache.enable_cache('cache_dir')

session = fastf1.get_session(2023,22,'R')
session.load()

fastest = session.laps.pick_fastest()
print(fastest)
The session.laps.pick_fastest() method is used to retrieve the fastest lap from all the laps in the session. Here's what it does in detail.
session.laps- This attribute of thesessionobject contains all the lap data for each driver participating in the session. It's a DataFrame that includes various details such as lap times, lap numbers, and the drivers who set them..pick_fastest()- This is a method called on thesession.lapsDataFrame. It filters through all the recorded laps and selects the single fastest lap from the race.
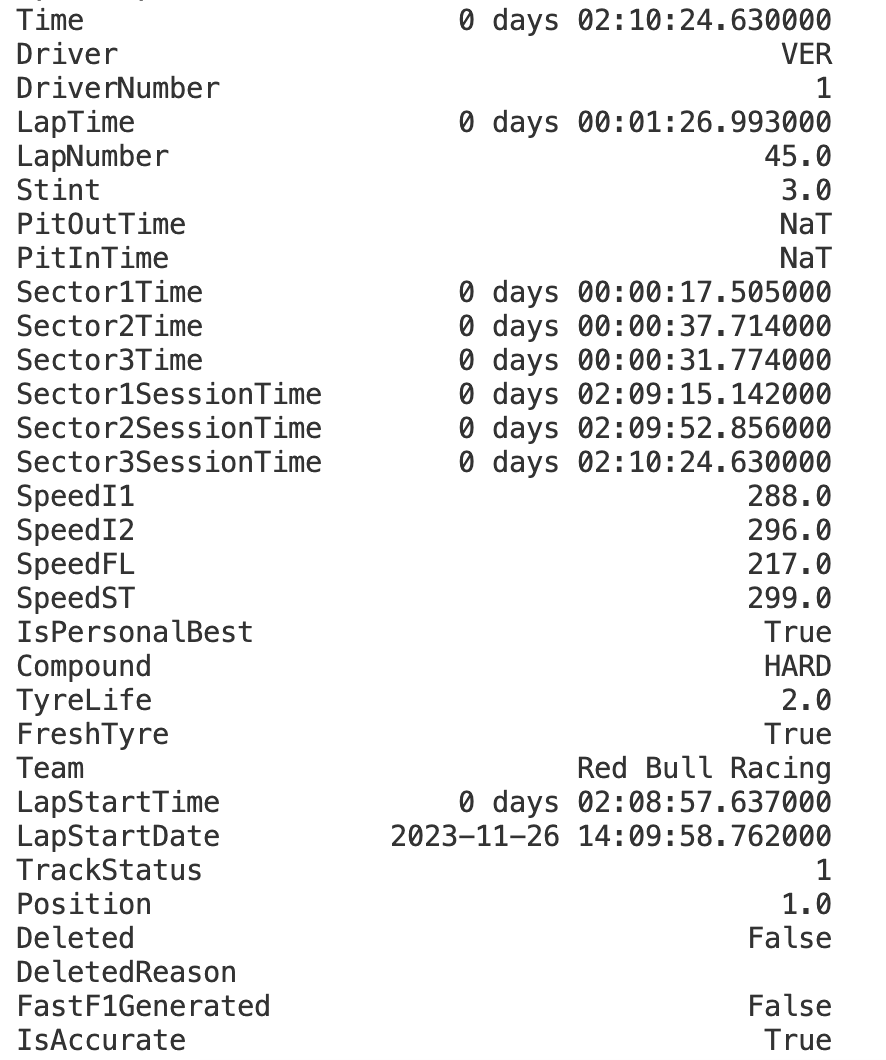
When you print the fastest variable, It tells you everything from which driver achieved it to the specifics about their car at that moment. For instance, you can see the driver's code and racing number, the exact lap time, and even the specific lap in the race when they were quickest.
It also shows the stint, type of tyre compound, tyre life and if they were fresh when the fastest lap was set. This level of detail can give us a deeper understanding of the conditions under which the fastest lap was set.


